
TOC
Kantha Jacket
I first became aware of coats made from Kantha quilts two years ago, when someone posted a picture of Heidi Klum wearing a Meiko Mintz coat (made from a Kantha quilt) on Stitcher's Guild.

I was smitten. I quickly started researching Mieko Mintz and her amazing work. I even found a boutique that sells her pieces locally and tried some on.
I then started shopping for Kantha quilts on Etsy and Ebay. I didn't buy one, however, and I moved on to other things.
Then, recently, Ann Smith, a local sewing buddy (who is well known on Pattern Review), made a Kantha quilt jacket, inspired by Meiko Mintz. It was fabulous.
(Ann is not posting these days, so I can't point you to any photos of her jacket, but it was great! She used Vogue 2949 - an OOP Sandra Betzina pattern that I made long ago.)
Anyway, Ann got me all fired up about kantha quilts again. This time I went shopping, and bought, a Kantha quilt on Etsy. It came from India but arrived quite quickly.
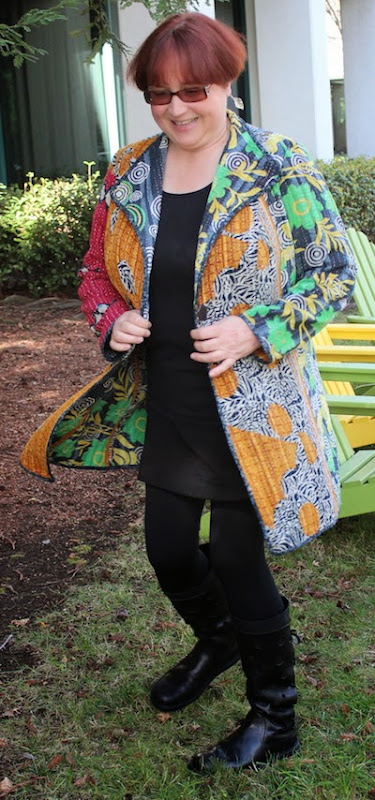
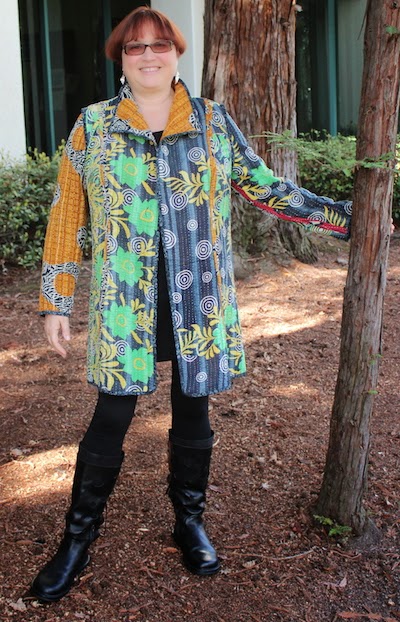
So...what style should I use for my jacket? The standard Meiko style, with its a-line shape, and giant collar, isn't flattering on me. (Trust me on this.)
So I decided to use a silhouette that works better on my uber busty, inverted-triangle-shaped form. Inspired by another RTW designer, I started looking for a pattern that featured shoulder front and back princess seams and a pointed shawl collar.
There was nothing like this available in any current pattern offerings. This is too bad as this is a great silhouette and very popular in current RTW.
I started searching OOP patterns on Ebay and I found one that had the right bones, but would need substantial altering: Vogue 1042.


The pattern and the quilt arrived in November, but I set them aside as I was working on other things.
During my 2-week break over Christmas and New Years, I decided I wanted to tackle this project. I pulled out the pattern, traced it off in my size, did an FBA, lengthened it, and changed the style lines a bit. I quickly ran up a muslin, because I was going to be seeing Ronda Chaney, head of the Fashion department at Cañada College the next day, and I wanted her to be able to take a quick look at the fit. I finished the muslin late the night before, so I had no time to finesse it.
When I modeled it for Ronda the next day, it was in fairly rough shape. She made quite a few suggested alterations.
I went home and incorporated her changes, creating muslin #2. The second muslin was better, but it needed further tweaking. (The first version was so off that it required more than one round.) I was going to be seeing my pattern drafting friend, Georgene, only a few days after seeing Ronda, so I brought muslin #2 along.
Georgene made quite a few further alterations. By the time I was finished with these two rounds of edits, the finished pattern barely resembled the original and, most importantly, it fit me to perfection!

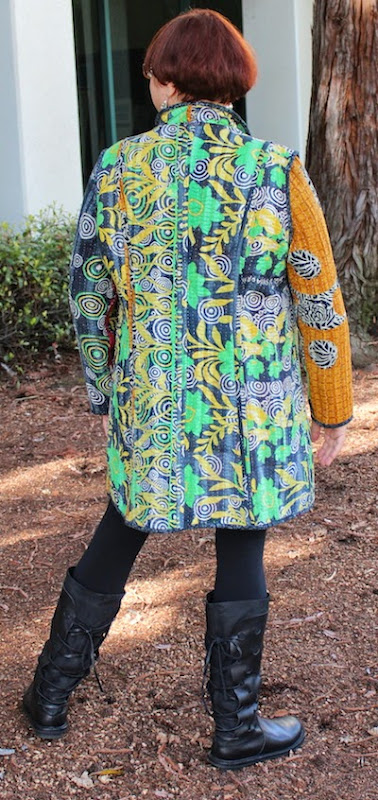
I was planning on making muslin #3, but Georgene convinced me to "go for it", so I grabbed the kantha quilt and started cutting. I'm not sure if you can tell, but I cut the quilt with careful thought as to how the design would flow around the body. I wanted the printed design and colors to flow in a particular way. The twin size quilt was just large enough to create the jacket—I had very little left over. I also did my best at cutting around the holes and imperfections, but I couldn't avoid all of them. (This quilt is quite authentic in its use of worn saris.)
One of the hallmarks of Meiko Mintz's jackets is that they are unlined and reversible. She finishes the internal raw edges with a purl marrow stitch, which is similar to a serged edge, in a contrasting color. She generally doesn't use closures, and the external edges are sometimes finished with the same purl marrow stitch, and sometimes she just turns both outer edges towards the inside and slip stitches them together—finishing them in a similar manner to a double-cloth coat. This results in garments with no extraneous fabric that are as light as air.
I didn't own a serger that I felt was good enough to use in this way, so I sewed my coat with normal 5/8" seams. (I have since bought a new serger...) On the wrong side, I turned under the raw edge under of each seam, and stitched it down by hand. (I really didn't feel the need for this jacket to be reversible, but I did want to finish it neatly.)

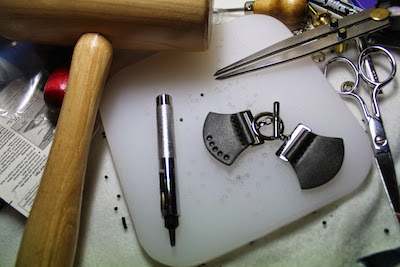
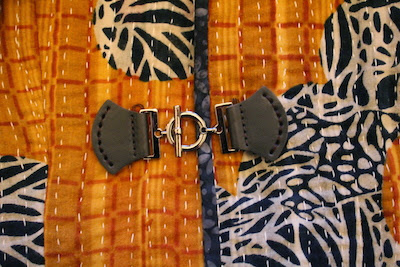
I finished the outer edges with self made bias binding made by using the 18mm bias tool from Clover. Finally, I added a dark brown toggle closure purchased at Britex.
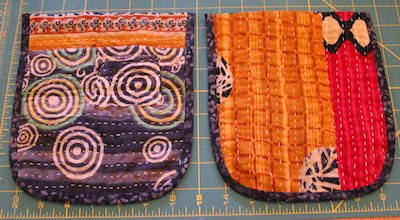
There is quite a bit of handwork in this coat, so it took me awhile to finish. For example, I made 8 yards of bias binding to finish the outer edges. I also made two patch pockets, also finished with bias binding, but I haven't attached them to the jacket. I may attach them still. Or I may put them on the inside. Or I may not use them.
I have't decided.

How do I feel about the finished jacket?

To be honest, I'm not sure. I'm not sure that it's "me." I love the fit. I looove the fit, the shape, and the silhouette, but I'm not so sure about the colors and the print.

I also think that, when I use this pattern again (and I will), that I will make the collar a bit larger. This will quickly become a TNT pattern for me and you can expect to see it in many incarnations. In fact, I have already started another version using a beautiful fabric from Marcy Tilton.

What do you think... Is this quilted, brightly colored, jacket "me"?
Time will tell.
I also decided to model it for some of the photos inside-out, because I can wear it that way if I want to.
I may bring it to Puyallup to wear.
Maybe.
Thanks, Ronda and Georgene for your fitting expertise!
Thanks, mem for taking these pics!
Self Made Earrings!

I decided over the holidays that I wanted to try my hand at jewelry making. And by that, I mean working with metal. The very next day, on January 3rd, an email dropped into my inbox offering a discount on a beginning jewelry making class at a studio in downtown San Francisco.
I jumped on it. I attended the class on the weekend before last. This 3.5 hour workshop offered a hands-on experience in metal folding, resulting in a pair of leaf-shaped sterling silver earrings.
I had never even heard of the metal folding technique before, so there was lots to learn. I find this sort of artistic expression difficult. Before you completely fold the metal, you paint the inside with ochre. Then you fold the metal completely in half and start hammering. This shapes the metal and imparts surface texture. But hammering the silver also makes it brittle so you periodically have to anneal it, which means you fire it. (Or, in this case, the teacher applies the fire.) After it's been fired, it returns to a soft and malleable state so that you can hammer it further without risk of breaking it.
You repeat this cycle over and over until you achieve the shape that you want. The ochre prevents the two sides from fusing together during the annealing process.
Then you cut the folded metal into a leaf shape, using your own self drawn template.
(I hope you are still with me, because I'm going somewhere with this blow-by-blow recap.)
Now it's time to open up the folded metal to reveal the leaf shape.
I should mention that the heat from the annealing process changes the ochre from it's characteristic mustard color to red.
Except, once opened, my pieces of metal didn't look so much like leaves as... something else.
I seemed to be the only student in the room wondering aloud why my pieces of metal looked like they needed underwear.

I took my pieces to the assistant and asked her what I could do to make my "leaves" look less...
"Georgia O'Keefe?" she offered helpfully.
"Yes."
I spent quite a bit of time re-cutting the leaves, bending and shaping them as best as I could, and scrubbing out the red ochre (which is very difficult to remove from deep in the fold - I had to use two different brushes and the magnetic cleaner machine).
My friends tell me that the resulting earrings are quite leaf shaped and not particularly "Georgia O'Keefe."
I hope so. Though they still remind me of my very favorite Everybody Loves Raymond episode, Marie's Sculpture.
I'm thinking that my silver-smithing career might be over. I didn't really enjoy the process that much.

Get Your Motor's Running Contest - the Results
Thanks so much for your votes in Rhonda's contest! The lovely Cennetta won with her beautiful rendition of a color-and-print-blocked sheath dress. Congrats, Cennetta!
On Sunday, I could see that I would not have the votes to win first prize, so I took advantage of the announced sale last weekend and I purchased Janet Pray's class—which comes with the moto jacket pattern—for half off. It's a win-win!