TOC
- Fabric Detective
- The Challenge
- Inspiration
- Pattern
- Cutting it Out
- Fit
- Zippers
- Construction
- Conclusion
This is a project that was entirely motivated by a unique piece of fabric.
I received 1.5 yards of this novelty fabric from Marcy Tilton—it was all she had left, but it was 60" wide, so I immediately started thinking about how I could make the most of a smallish, but fabulous, piece.

While this fabric might look like a conventional black fabric in some of the pics, it is a very interesting textile. At a casual glance, I thought it was two fabrics that had been fused together. One layer was furry and the other layer was a lightweight satin fabric with a slight sheen. The furry piece has oval-shaped "holes" where you can see through to the satin side, and there is zigzag stitching around each oval—presumably to keep the two layers together. The furry side is intended to be the "right" side, but I loved the other side even more.

As I thought about it further, I realized that my assumption had to be wrong. What had created that highly textured surface on the wrong side? Using some scissors and a seam ripper, I deconstructed a small piece of the fabric.
And it turns out that my first assumption was wrong! The base layer of fabric is a lightweight poly satin fabric, and loosely plied yarn is set into the base fabric to form the fur! There is a machine zig-zag around each oval, probably to help anchor the "fur" in place and, I believe, the right side of the fabric was brushed to make the fur more... furry... and to hide the individual yarns. (As a result, the fabric does have a nap.)

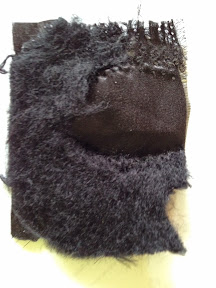
- Left: The "wrong" side of the fabric, showing the holes in the base fabric after the "fur" has been removed from the upper left corner
- Right: The "right" side of the same piece of fabric
Fascinating!
I gave myself the following challenge:
- Make the best use of the limited yardage, mixing it with other fabrics if needed.
- Feature both sides of the novelty fabric, though predominantly use the back side, which is my favorite side.
- For comfort, incorporate some stretch into the garment (the novelty fabric has no stretch).
- Make something that I wear get loads of wear out of.

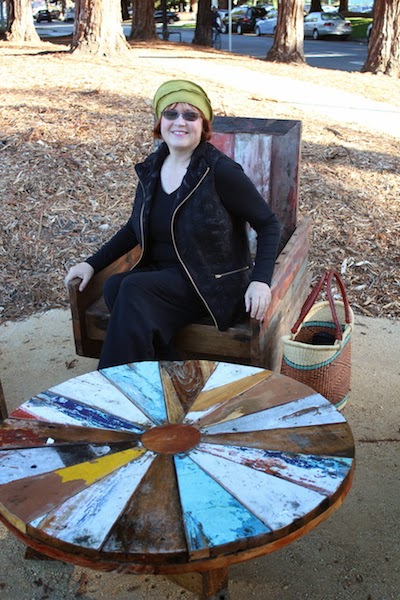
My favorite garment that I ever purchased is a black wool jacket. This piece (which I bought at a huge discount) uses a novelty fabric that features strips of fringed wool. I wear this jacket all of the time—it's rare for a week to pass without me wearing it at least once, and often more than once. One of these days I will trace off this pattern (which has interesting seamlines) but, until then, I mulled over which aspects of the jacket appeal to me. These features include: the stand-up collar, the length, the presence of pockets, the front 2-way zipper, the color (black goes with almost everything) and, of course, the texture of the fabric.
I am crazy for the texture.
I decided to make something which had many of the same features, to maximize its usefulness in my wardrobe. Because I had a limited amount of fabric, I planned to also include a second fabric, also in black, as I didn't want high contrast. After much dithering (I was trying to decide between a black crepe double-knit and a black stretch taffeta), I decided to go with the taffeta, because the slight sheen of the taffeta echoed the sheen of the satin in the novelty textile. And what about sleeves? Rather than use the contrasting stretch taffeta for the sleeves, I decided to make a vest.

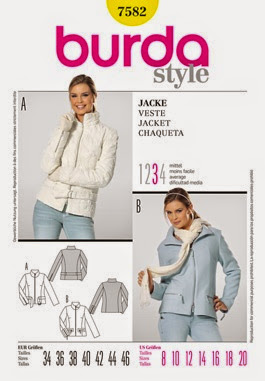
One day, while working in the SF office, I made a lunchtime visit to Nordstroms in Union Square. I tried on outerwear garments in the Eileen Fisher department, including a vest similar to the one I ended up making. It had: princess seams front and back, and the front featured an off-bust princess seam (meaning there is a dart from the princess seam to the bust point), a zip front, and the stand-up collar that I love. I was inspired to look for a similar pattern, but such a pattern was nowhere to be found in Vogue or Burda envelope patterns. I then found a special Burda issue from Fall/Winter 2013 that had the exact silhouette I was looking for. Unfortunately, the design only went up to a size 44; meaning that I had to trace it off, grade it up, and increase the FBA.


This was enough altering to warrant a muslin, but it was worth the effort.
I will add that, as I was later searching Ebay and Etsy, I found the exact same Burda offered as an envelope pattern. It's OOP, but well worth tracking down.
I cut the novelty fabric out carefully, in a single thickness. I cut out the pattern pieces as follows:
- The center front and center back were cut from the BACK (textured side) of the novelty fabric.
- The collar and front facings were cut from the FRONT (furry side) of the novelty fabric, so that you see the furry side when I wear the collar folded back.
- The side fronts, side backs, and back lining were cut from the stretch taffeta.
I've already mentioned how Georgene helped me perfect the fit. At that point I had to do much thread tracing to capture her edits and then to translate them back to the paper pattern (for future use). I also ended up re-cutting the side back pattern pieces, but I had plenty of the stretch taffeta, which I also used for the lining.


I wanted to use a 2-way separating zipper for the front and coordinating one-way zippers for the zipper pockets. I already had two brass zippers in my stash from another planned, but not executed, project. To go with those, I ordered a brass toothed, two-way, separating zipper, in black, cut to 26-1/2", from Zipperstop. I also ordered a brass foxtail slider. (If you do this, make SURE that you ask them to put the slider ON to the zipper. I once forget and I received an envelope with the zipper and the slider, but not together. I had to put them together myself, which is a real PITA.)

The vest came together well, but it took me a few weekends. The jacket pattern is unlined and I wanted a lined vest, so I had to do my own lining. I drafted the zipper pockets and placed then where I liked. I used leftover fabric (which you may recognize) from another project for the pockets. (The reverse side of this fabric is solid black, so the inside of the pockets are black.)


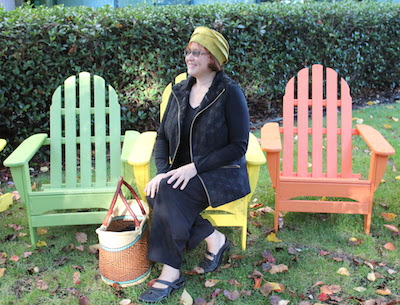
Did I accomplish my goals? Yes, I think so. I like that you can see the furry side of the fabric at the outside of the collar and when the neckline is folded open. The stretch taffeta provides some "give". Only time will tell if I do get a lot of wear out of this, but I am hopeful!


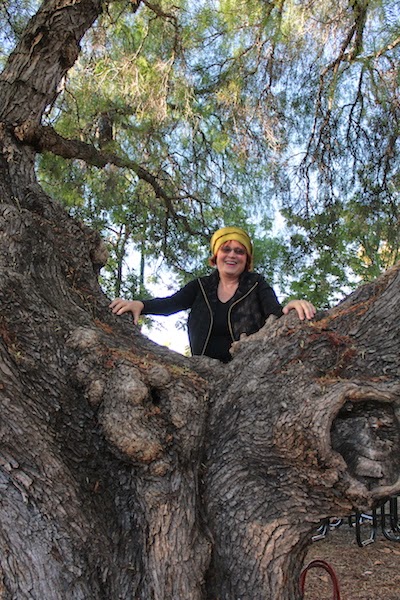
Thank you to my colleague, Mary Campione, for taking these pics!

In truth, Mary thought you might want to see this Oska hat (from several years ago) up close.