Monday, October 28, 2013

New Winter/Holiday 2013/2014 Vogue Patterns


The Fabric Mart poll is up for the 6th challenge. Please Go vote!

I continue to hear good things about changes at the helm of McCalls patterns. This is very heartening to hear.

I hear that they are open to input.

In that spirit, I am going to give some feedback on all of the non-dress patterns that were released today in the Winter/Holiday batch of patterns. I normally only highlight my favorites, but I thought I would expand my comments this time around. There are a lot of dresses and I will leave those to be reviewed by folks who wear dresses, or get excited by dresses.

Vogue 8954
I am very excited about this asymmetric, seamed vest from Marcy Tilton.
Very. excited.
I. want.

Vogue 8966
Marcy Tilton has a new accessories pattern. This has 2 hats, both are incredibly cute, as well as some scarves and fingerless gloves. I am especially in love with both hats.

Vogue 1376
Sandra Betzina has a new tunic top and leggings. I know from experience that these leggings are likely to be too large for my freakishly tiny hips, but the top is cute with draw strings in the shoulder seams. It strikes me as a rather summery design, so it's interesting that it was released in the winter batch.

Vogue 1375
While this is a cute vest made up in the black organza with striped binding, it is very loose and unfitted. This would not flatter me at all. Clothes that lack shaping below the bust are not for me, but it would be cute on the right person. (It would look great on Peggy!)

Vogue 1377
I love Koos van den Akker's design aesthetic but, once again, this coat is too unfitted for my liking. I will buy this pattern anyway because it has interesting details. One of my friends calls patterns like this "reading material".

Vogue 8956 - Very Easy Vogue Options
This is a nice basic wrap skirt with drape options. I like it.

Vogue 8965
Two styles of wrap tops. These are cute and unusual!! I like very much! (Though I would have to muslin the cropped version to see if it works with my bust - it all depends on where it lands.)

Vogue 8952
Another tee that is fitted through the bust, flares at the hem, and has a high-low hem. There is a cowl option. It feels like we have seen this many times before. I wish this top offered more interesting details, more variety. We see the same styles over and over. It's fine if you don't have anything like this in your pattern stash, but it feels like a missed opportunity.

Vogue 8951
Pullover tunic (with optional hood) has side slits, back is slightly longer than the front, kangaroo pocket.... YAWN. Again, we have seen this. Repeatedly. I was at a blogger meetup recently and a woman was wearing a hoodie that had an interesting detail at the wrist. It was fitted at the wrist and there was a shaped inset using a really stretchy power-type fabric. It was very cool. Why can't we have some interesting details like this? Or maybe an unexpected pocket. Please? This feels like another missed opportunity, Vogue.

Vogue 8950 - Pullover tunic with yokes and side slits.
Really?!?!? Haven't we seen this a million times? And, by the way, if you have a large bust, this yoke might be very unflattering indeed. Unless you are a completely new sewist, you already own a version of this pattern. Definitely a missed opportunity. (It also looks like the neckline might be very wide and might need modification.)

Vogue 8962 - Very Easy Vogue, Pullover Tunic, Skirt and Pants
Don't be seduced by the stripes. This top is ok, it isn't really exciting, but it's got some interest to it. The skirt and pants are basic. This pattern is a maybe for me - it's ok, but doesn't have me super excited.

Vogue 8964 - Men's Robe and PJs
Really, Vogue? Only one pattern for men and this is it?! If I sewed for men, I would not be happy. I have been craving (for years now) INTERESTING robe patterns. Something other than the ubiquitous wrap robe. For example, how about a robe like this:
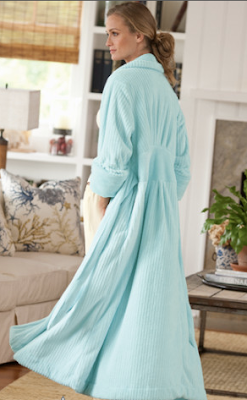
The front looks like a regular wrap robe, but...

...the back has a wonderful inset yoke at the waist. This would help the robe "stay on" better and would be comfortable and flattering. I would love a robe pattern like this!!! How about it?
Vogue?
Someone???

Vogue 1378 - Donna Karan top and pants
O.M.G.
Look at these pants. LOOK AT THESE PANTS!!!
Excuse me while I elbow people out of my way to get at these pants.
And they come in a size 4!!!!!
SWOON. This and Marcy's vest are my two favorite patterns in this batch.
HEY! Did you SEE these PANTS?!?!

Vogue 8957 - Four "shrug" style evening jackets
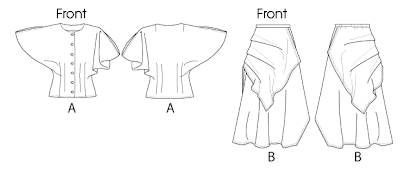
Wow, if you need something like this, view A, with the seaming is very interesting! (The pic above shows the back of view A.)

Vogue 8953 - "Peasant blouse"
Easily one of the most unflattering patterns I've seen in a long time. I wore this top in the 70s, when I was a teenager. It didn't look good on me then, either. This style is not flattering on most, unless you are very thin and your fabric is very floaty.

Vogue 8963 - suit w/ princess seamed jacket, skirt, pants and top/dress
This is ok. I always look at suit patterns because I hope that I might see a jacket I want. This one seems like one I've seen a million times before. Nothing new or exciting in the details. The bias top/dress has flutter sleeves. It might be worth purchasing the pattern if it excites you, but it doesn't grab me.

Vogue 8958 - Lined vest or jacket with princess seams.
Again, nothing new or exciting here and, in fact, that deep v-neck with the low-slung lapels (view D) can give one a "droopy boob" look. I wouldn't chose this silhouette, but it could look nice on the right figure.

Vogue 8960 - Very Easy Vogue, Unlined coat.
Really, Vogue?!? Really??? As we head into winter, you give us one winter coat and this is it? It's not even lined and it is SO.BORING. A huge missed opportunity.

Well, that's my take on the batch. As always, YMMV (Your Mileage May Vary). :D

#6 - FabricMart Choice - Polyester Chiffon Panel Print


(Sorry that this post is later than usual. I had other things I had to get done over the weekend and I didn't get this post written up Sunday night, as I usually do. I do work full time, so I had to squeeze in the writing of this post around work on Monday.)

TOC:

Rules for Challenge 6

Using the fabric we have selected for you, challenge yourself by making a unique garment and working with a material you may not have used before to create one well-made garment. You can use a pattern of your choice to construct your garment.

You will be judged on creativity, functionality, craftsmanship, and fit.

Fabric

FabricMart sent each contestant the same fabric. Two panels of a polyester chiffon striped panel print. I hung it from my front porch so you could see the whole thing.

A Challenging Challenge

This challenge was definitely my most challenging challenge. I am not afraid of sewing polyester chiffon (and, in fact, I used it last week on the first version of the vintage dress), and I love stripes, as a rule. But the colors in this fabric are just not my colors and this is not a fabric that I would buy for myself. It would look completely out of place in my closet.

Dyeing the Fabric

What I really wanted to do was to dye the yardage. I took a piece of the fabric, some Kelly Green iDye, and a stainless steel cooking pot to see what would happen.

Wow, iDye is an interesting product - this was my first experience with dyeing polyester. You dissolve the two "flavor" packets in water, toss in the fabric, and cook for 30-60 minutes. The instructions say to stir often, but they don't say to stir constantly.

I learned some interesting things:

  • The fabric turned solid green almost immediately. (A very pretty solid green, I might add.)
  • I found that I *had* to stir constantly. If I stopped stirring for a few seconds, it was like cooking tomato sauce. Huge bubbles would erupts, sending jets of hot dye all over the stove, on my floor, and narrowly missing me.
  • It produces an acrid odor that smells quite toxic. I guess it takes heavy chemicals to dye polyester.
  • Even though I turned the heat down to the lowest setting, dangerous bubbles continued to erupt.
  • I decided that cooking it for 10 minutes was enough. (I didn't want to keep dodging jets of hot dye or stirring constantly for another 20 minutes.)
  • Ten minutes *was* enough. The fabric was colorfast, even when I washed it in the washing machine.

Once the fabric was dyed, I liked it much better. I even liked the hand of the fabric better. I was sorely tempted to dye the entire yardage, but I was pretty sure that the judges wanted us to use the panel print, so I resisted. (But it was not easy for me.)

I had chosen the kelly green dye because I thought it might complement the striped fabric, and it did. I decided to use the dyed fabric as an accent.

The dyed fabric alongside the striped.

Taming the Fabric

To tame the polyester chiffon, a notoriously wiggly and uncooperative fabric, I used a Palmer Pletsch product called Perfect Sew.

Perfect Sew is some great stuff! The instructions tell you to lay the fabric down and to spread the product over it. I did *not* want to do this. This liquid is gelatinous and I did not want to get it on my cutting table. Instead, I put the fabric into a bowl, squirted the Perfect Sew on, and "tossed" the fabric like it was a salad until it was evenly coated. I squirted on additional Perfect Sew as needed. My hands became very sticky, so I am glad I did not get this on my cutting table.

Coating the stripes with Perfect Sew
Coating the dyed green fabric with Perfect Sew

By "tossing" the fabric, I got very good coverage with the gel. I then hung the yardage over the shower curtain rod to dry. I smoothed it as much as possible as it hung from the rod. Once it dries, it has a "crisp" hand to it. It is very much like sewing on organza, rather than chiffon. Organza is not an "easy" fabric to sew either, but it is much more manageable than a squiggly chiffon.

Out of sight of the camera, I am holding the fabric away from the rod.
See how rigid it is?
Nice and crisp.

Once you have completed the garment, you wash it and it returns to it's previous soft state. The instructions say to machine wash, but I washed it in the sink with warm water, changing the water a couple of times, and swishing it thoroughly. I then laid it in a towel, and rolled it up to remove the excess water. I then hung the top on a hangar, again from the shower rod, to dry. It dried very quickly and required only a light pressing to remove some wrinkles.

Original fabric on the left. Fabric treated with Perfect Sew on the right.

I highly recommend Perfect Sew, though you can't use it on garments that can't be dipped in water, such as on a lining for a tailored wool jacket.

The bias neck binding. Treated with Perfect Sew, the bias strip holds a crisp pressed edge.
The strips for the front bands, also treated with Perfect Sew

Choosing a Pattern

I did not want to make another dress. I rarely wear dresses, and I've made three dresses in the last three challenges, so I decided to make a top. Inspired by some RTW tops, I decided to use the stripe horizontally and to use the solid green as contrasting front bands.

After a lot of dithering, I settled on a Sandra Betzina pattern. This pattern includes a top and a skirt, and I had made the skirt last January. I liked the top, but hadn't gotten around to making it. And then, at Pattern Review weekend last April, Sandra Betzina wore a top made from this pattern and I quite liked it on her. After PR weekend, a sewing friend made the top and it looked great on her.

Both of these women are "normal" busted, I might add.

(A little foreshadowing here.)

I decided to use the stripes in the panel print on the horizontal. This meant that I would have to match the stripe at center front and at the side seams. Matching this stripe is a bit challenging, as it morphs as it travels across the panel. Some stripes change width, and meander, or even just "pop" to a new location.

Cutting out the back

This top has a very interesting sleeve design, as you can see in the following picture.

From from V1333. You can also see my vertical only FBA (I did not need width) and the shirttail hem that I added.

The side seams are sewn, all the way up to the top point. That "petal" shape of the pattern becomes fabric that bunches up under the arm, gracefully, one hopes. The top part of the petal, where the scissors are positioned, is left as an unsewn slit and becomes the sleeve opening.

So cool, in theory, but so awful on me.

In my case, the fabric bunching up under the arm made my boobular area look completely out of control. The slit for my upper arm was just big enough for my arm with no extra ease, making it look like a pasta machine was extruding my arm.

Not pretty.

So I had to make some changes. I unsewed the side seam beginning above the bust and I left the rest of it unsewn. This created the "flutter" sleeve. I trimmed it up a bit and then hemmed it, using teeny tiny hems. I left the original slit in place, and hemmed that with teeny tiny hems.

The resulting sleeves are much better for a busty person with fuller upper arms.

Trimming the seam allowance from the hem, before the final fold that encloses the raw edge.
Completed sleeve hems

Alterations and Modifications

I used my normal Sandra Betzina pattern size - a C. I made the following modifications:

  • A 1" vertical only FBA, so there are side seam darts.
  • I omitted the waist darts.
  • I added the shirt tail hem to front and back, copying the one from the Grainline Archer.
  • I omitted the front facings and the back neck facing.
  • I finished the neckline with a bias band.
  • I finished the front with narrow bands, cut from the dyed chiffon.
  • I modified the sleeves (as described in the previous section).

Construction

Except for the issues that surfaced with the sleeves, the construction was pretty straightforward. There were a lot of teeny tiny hems to sew. I showed the technique in my post for challenge #5, but here are a couple new pictures.

Cutting the seam allowance from the bottom hem
Both sides of completed hem

More Pictures

Pattern

Vogue 1333