Thursday, January 28, 2010

Au Bonheurs des Petites Mains - Measurement Chart

I contacted the Au Bonheurs pattern company and asked them if they had a measurement chart available, as I did not see one on their website. This is what they sent me.

I translated and converted the metric values to Imperial measurements. I have rounded the measurements off to the nearest quarter inch – the original metric values are in parenthesis.

Women's Size Chart

Size Bust Waist Hips
32 30 3/4" (78cm) 24 1/2" (62cm) 33" (84cm)
34 31 1/2" (80cm) 25 1/2" (65cm) 34 3/4" (88cm)
36 33" (84cm) 26 3/4" (68cm) 36 1/4" (92cm)
38 34 3/4" (88cm) 28 1/4" (72cm) 37 3/4" (96cm)
40 36 1/4" (92cm) 30" (76cm) 39 1/4" (100cm)
42 37 3/4" (96cm) 31 1/2" (80cm) 41" (104cm)
44 39 1/4" (100cm) 33" (84cm) 42 1/2" (108cm)
46 41" (104cm) 34 3/4" (88cm) 44" (112cm)
48 43 1/4" (110cm) 37 1/4" (94.5cm) 46 1/2" (118cm)
50 45 3/4" (116cm) 39 3/4" (101cm) 48 3/4" (124cm)
52 48" (122 cm) 42 3/4" (107.5cm) 51 1/4" (130cm)
54 50 1/2" (128cm) 44 3/4" (114cm) 53 1/2" (136cm)
56 52 3/4" (134cm) 47 1/2" (120.5cm) 56" (142cm)

Monday, January 25, 2010

Report -- Marcy Tilton's Inspiration Paris CD

I just received Marcy Tilton's new virtual workshop CD, Inspiration Paris. I pre-ordered a copy that arrived Saturday and I wasted no time in checking it out. :)

In order to use the CD on the Mac (which is what I have), QuickTime and Adobe Reader are required. I did not have Adobe Reader installed, because the Mac generally uses Preview to read PDF documents, but Preview doesn't work properly with the video segments.

Once I downloaded and installed Adobe Reader, I clicked on the Inspiration Pris.pdf file to launch Reader and open the file. Page 1, is a title page. Page 2 is an index. From there you can select Videos, Galleries (photos), or Links. The Videos are listed on page 3, and there are five to choose from:
  • Piecing featuring Marcy's technique of subdividing a pattern to create a multi-seamed design.
  • Strips featuring Marcy's technique of embellishing with fabric strips, both plain and pleated.
  • Zippers showing how to install a separating zipper. She features a beautiful Riri zipper.
  • Holy Moley shows Marcy's technique for circular inserts.
  • Travel Wardrobe – Marcy walks you through her own travel wardrobe and how she plans it out. Her wardrobe fits into a small suitcase and takes her from three to six weeks in Paris.
If you look at Marcy's home page, there is a video segment on Hong Kong finishes. They did not have enough room to include this in the CD, which is too bad, but you can see it online here: The index for the photo galleries (page 4) breaks the photos down into several categories:
  • Fashion
  • Shopping
  • Museums and Tours
  • Streets
  • Marcy's (including garments she has purchased and created)
Most of the photo pages are collaged, and many are annotated. The photos go from page 5 to page 78. The links and text begin on page 79. It begins with an overview of her Paris trips. Beginning on page 82 she lists some of her favorite places to stay, shop, and places to go for inspiration. She also has a list of blogs that she recommends relating to Paris and Paris fashion. Finally, several pages are dedicated to two walking tours ("promenades") that she recommends, telling you exactly where to walk, where to stop, etc. If I were planning a trip to Paris, this resource alone would be invaluable.

I was happy to see Marcy offering this CD at the price point of $20. Her website says she plans more in this series of reasonably priced CDs. I welcome that, because $40 for a CD that you have not been able to preview requires a great leap of faith.

From the video segments, I most enjoyed the video on the circular inserts, called Holy Moley, particularly the technique she uses to create a "pick stitch" on the front of the garment, perpendicular to the seam. This seaming technique is not just decorative – it actually secures the seam. I am not sure that my older sewing machine is capable of creating that effect, though I plan to try. The extensive slide show is a rich visual feast and I will be going back to look through those images more carefully. :)

If any of you own her screen printing CD, can you leave info in the comments about it? I would love to see it, but $40 is a significant investment. :)

Sunday, January 24, 2010

Vogue 2704 - NY/NY skirt


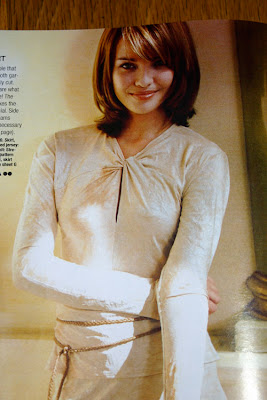
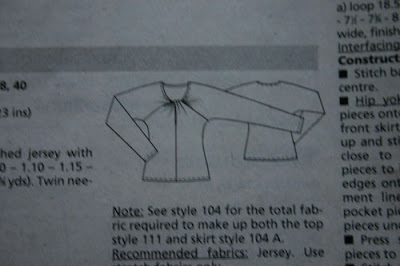
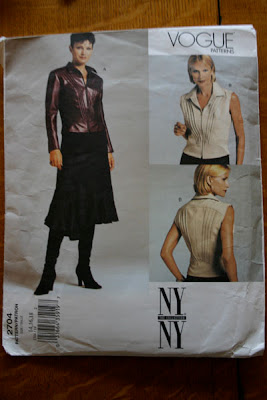
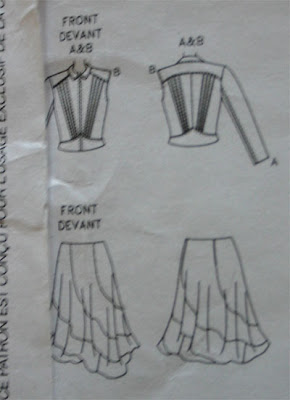
This favorite, but OOP, Vogue pattern is from their now-defunct NY/NY line. The pattern features a jacket and a 5-gore, spiral skirt. The pattern says there is no accommodation for shortening or lengthening the skirt but, at a finished length of 24", I decided I was going to lengthen it, and also to convert it from a faced waistband with a zipper to an elastic waist. When a pattern says there is no accommodation for lengthening or shortening a design, all that means is that they don't want to be bothered with it because it is not straightforward. It does not mean you can't figure out a way to do it. ;) The "more correct" way to do it would be to completely redraft the spirals, but I didn't want extra width at the hips anyway, so my approach achieved the look I was after.

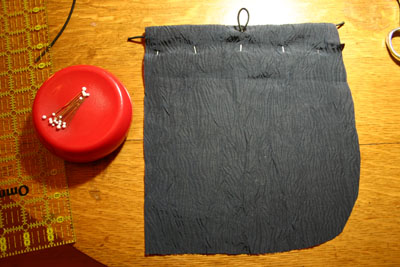
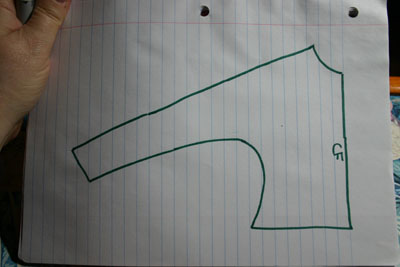
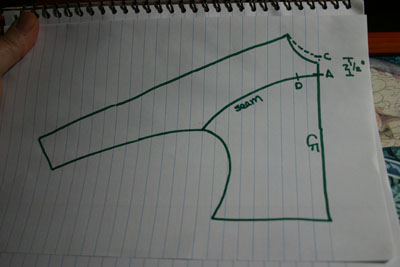
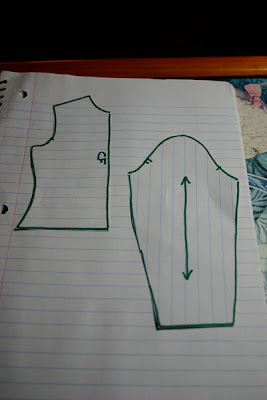
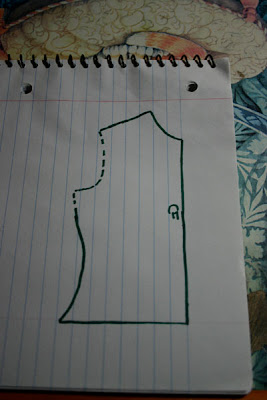
You can see my altered pattern piece in the photo below. I started with a size 16, increased the waist to the same measurement as the hip, and added 6" to the top of the pattern. If you read the reviews of this skirt on 
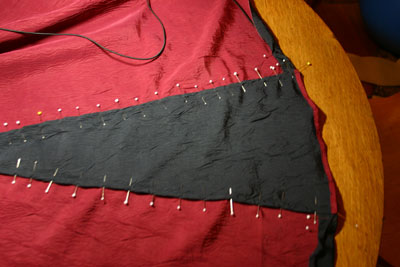
Pattern Review, there was an error in the original printing of the pattern. If you followed the original instructions, you would cut the spiral on the folded fabric, which would cause the spiral from the top layer to go in the opposite direction of the spiral from the bottom layer. Later printings of the pattern corrected the layout, telling you to cut the skirt in a single layer, with all spirals going in the same direction. My pattern, from ebay, shows the earlier layout.

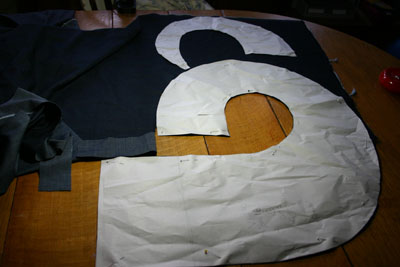
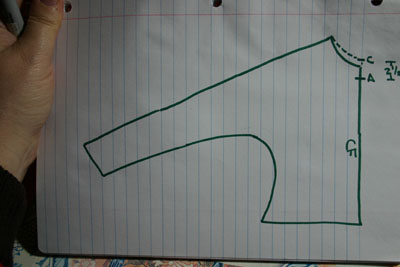
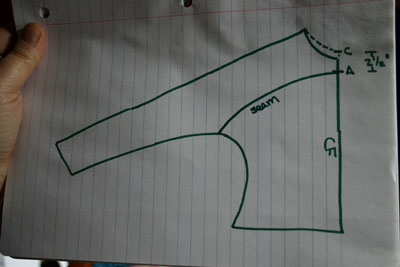
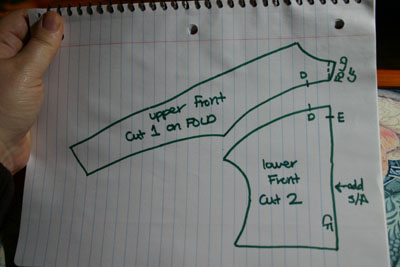
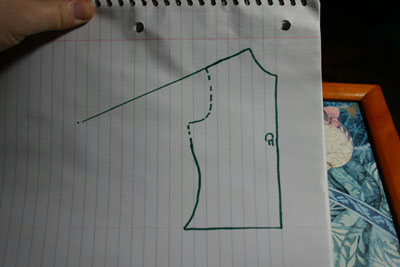
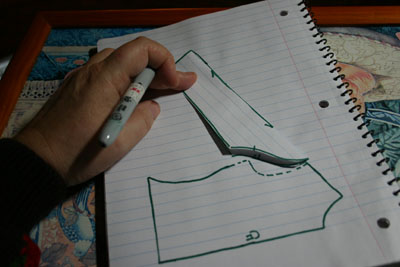
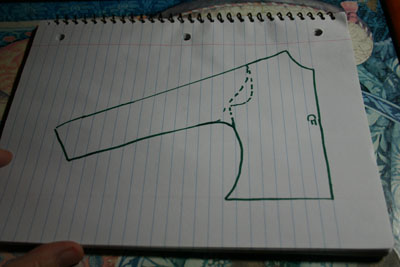
My altered pattern piece for the gore. The smaller pattern piece is attached to four of the gores to lengthen them. There is another pattern piece, which is longer and wider, that is attached to the 5th gore so that it creates an asymmetric hem.


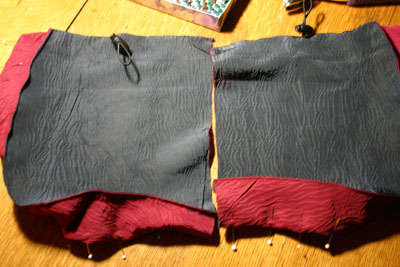
Once you cut out the 5 upper gores, you then cut out 5 bottom pieces, each one is sewn to the bottom of the gore to lengthen it. Four of the bottom pieces have the same shape, but one is larger/longer, causing the skirt to have an asymmetric hem.

The fabric I used is from Emma One Sock. I purchased it several months ago when I was looking for a cotton/linen blend denim. This fabric, a linen silk blend in a twill weave, is a charcoal color. When it arrived, it was not what I wanted for the project in mind, so I tossed it into a pile. When I decided to make this skirt, I realized it would be perfect. The fabric has a gorgeous hand, beautiful drape, and went through the washer/dryer like a champ. The two yards I bought was not enough for the pattern, but I was able to very carefully squeeze it out.

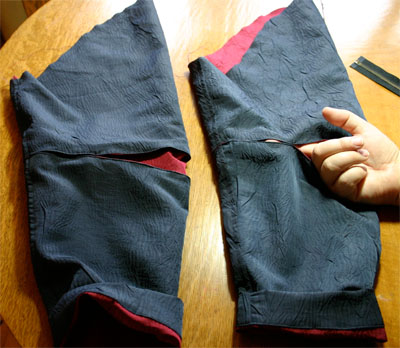
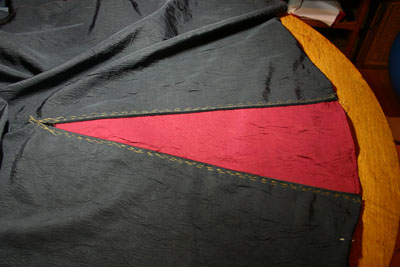
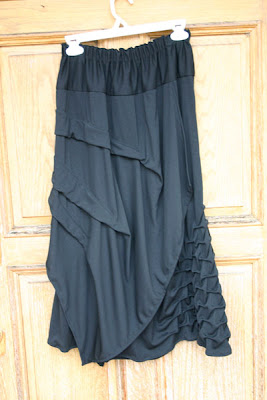
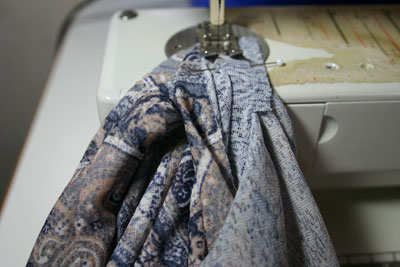
Sewing the skirt is fairly straightforward, but the process is similar to sewing a tapered circular ruffle to another tapered circular ruffle, and so on, until you have 5 circular ruffles sewn together. Hemming it was a bit challenging, but I sewed close to the edge of the hem, trimmed, made a tiny 1/8" turn of the fabric, and topstitched.

Hemming the skirt with a 1/8" hem.


And here is the final result. I was getting ready to go to a BABES meeting. I'm not sure exactly what that stands for, but it's a Bay Area Sewing Group from PR. I had just washed my hair, and it had been raining, so that's why I look like a drowned rat. :)

Tuesday, January 19, 2010

Au Bonheur des Petites Mains - Raincoat (VL000001)


Note: This is a long post. If you want to jump to the photos of the finished coat, here you go.

This pattern comes in two sets of sizes – 36-44 and 46-52 (note that the links take you to different pages). I purchased the larger size and made the size 52, except for the shoulder width, which I decreased by 2". This pattern's difficulty rating is 2 (out of 4). I disagree with this rating. The skirt with twisted drape was also rated 2 out of 4 and that skirt was very easy and quick. I would rate that skirt a 1 and this coat a 3.

As with other Au Bonheur patterns, this one has no seam allowances included, it is in French only, and the instructions are minimal, with no illustrations. For example, this raincoat is supposed to be lined. The instructions say, "Make the lining." That is all it tells you and it gives you no special lining pieces. :) It's not difficult to make lining pieces, but be aware that this pattern is not going to hold your hand.

Before I made my muslin (which I strongly recommend), I translated the instructions, first using online translators, and a Big 4 pattern, and then I met with a French friend to figure out the last few details. I have been creating/maintaining a French sewing glossary as I use these patterns. When I made my actual garment, I did not even refer to the instructions since I had worked out most of the details in the muslin. (Though I had not bothered with the zippers, snaps, elastic, facings, or other finishing details on the muslin, so I still had details to figure out.)

Supplies


For the fabric, I had two possibilities in my stash. Both are double sided, both are textured, and both are water resistant. At first I was leaning towards the other fabric, which is pleated, but when I decided to join the 2010 Swap on Stitcher's Guild and chose a color scheme of black/grey/crimson, I decided to use the crinkled fabric which is black on one side and reverses to crimson. This fabric is completely synthetic and strongly resists pinning – many pins died in the creation of this coat. The pattern calls for 3.5 yards of 55"/56" fabric for all sizes. It calls for the same amount of lining fabric, which I omitted.

Aside from the fabric, you need the following:

  • 5 snaps, size 24. I used snaps from snapsource.com.
  • Elastic. The pattern calls for 1" wide elastic (1 yard) for the waist and 1/4" or 3/8" (2 yards) wide elastic for the pockets and hem. I used round elastic cord for everything.
  • Toggles or cord stoppers. 6 total, if you are using the cord elastic. Two for the pockets, two for the hem, and two for the waist elastic.
  • 6 Grommets or metal eyelets. I used the 5/32" Dritz grommets in black, from Joann's, and I installed them with my new Prym Vario eyelet setter. This kit was almost twice as much at Britex, so I mail ordered it. Again, if you are using regular elastic, and no toggles, you do not need these. Instead of grommets, you could make buttonholes, but I love the grommets. :)
  • A standard 22" closed-bottom zipper for the back gusset. The pattern calls for a 55cm zipper, which translates to 21.7".
  • A separating 26" zipper for the coat front. The pattern calls for a 65cm zipper, which translates to 25.6". You can actually use a longer zipper, but if you do use a longer zipper, check it against the front tab, which is cut to exactly cover the zipper. Even with a 26" zipper, I had to lengthen the front tab about an inch.

    I love this YKK separating zipper with metal teeth and a substantial, decorative metal pull.

    The front tab was lengthened a bit to accommodate the zipper.

Alterations and Other Considerations

  • I lengthened the front tab slightly to ensure it covered the zipper. Prior to cutting the front tab, lay the zipper you choose along the tab pattern piece to make sure it is sufficiently long.
  • Note the front hem of the jacket in the garment photo and in the line drawing. See how the hem is shorter in front in the line drawing, but it does not appear to be shorter in the garment photo? The photo is accurate and the line drawing is wrong. The hem is shorter at the sides, longer in the back, and also longer in the front (but not as long as the back). It looks strange in person - a bit dumpy. So I shortened the hem at CF to look more like the line drawing. I caught this discrepancy when I made the muslin.
  • Make a muslin!!! I discovered that the shoulder seam was far too wide. After mulling it over for quite awhile and studying various techniques for narrowing the shoulder, I finally just lopped it off by about 2". I also removed an inch from the side seam at the armhole, tapering to nothing at the waist, to accommodate this alteration.
  • The casing for the waist elastic is formed by stitching a channel in the coat through the outside fabric and the lining. Since I wasn't using a lining, I cut a bias piece and attached it to form the casing. I placed grommets just on the front, near the side seams, and cut the elastic 39" long, sticking a loop of elastic out of each grommet.

Since the instructions are so minimal, I will include some of my construction details here. Note that I used round elastic with toggles (cord stoppers) at the hem, the top of the pockets, and the waist. The instructions specify regular elastic, but the garment in the photo clearly uses the round elastic with toggles. I liked that effect, so that is what I wanted to replicate.

Hood:

Like the rest of the raincoat, the hood was intended to be lined. Since I did not line it, I used different finishing techniques.
  • Flat fell the seam at CB.
  • Turn under the raw edge around the hood and top-stitch. There is a slight angle I had to maneuver around and, if I had been thinking ahead, I would have smoothed the angle into a curve when cutting out the hood, but I was able to make it work without too much difficulty.

Pockets:

The 3D patch pocket is unlined and the flat edge is caught into the side seam. The rounded edge and bottom are attached to a bias-cut rectangular gusset. The top of the pocket is finished by turning the facing to the inside and top-stitching in place. Here are the steps I used:
  • Fold the self facing to the inside on the fold line and locate the center point. Insert a grommet at that point, on the outside of the pocket, 1/2" from the top.
  • Fold a piece of elastic cord, cut to 13", in half and insert through the grommet, from the back to the front.
  • Lay the rest of the elastic along the casing, with one end of the elastic sticking out of each side of the pocket.

  • Fold under the raw edge of the facing, pin it, and top-stitch in place.
  • Stitch along both raw edges of the casing, catching the elastic in place.
  • Place the folded piece of the elastic, which is sticking out of the grommet, into a toggle.
  • Pin the gusset to the pocket, starting at the bottom (near the flat edge), going around the curve, and up the side. (I used the red side of the fabric for the gusset.) The gusset will extend beyond the top of the pocket by approx 2". Fold that excess twice, essentially making a hem, so that the top of the gusset exactly matches up with the top of the pocket. Top-stitched the top of the gusset in place and then finish pinning the gusset to the pocket.
  • Sew the gusset to the pocket. Finish the seam, by zigzagging, serging, or with Fray Check.
  • Edge stitch along the gusset seam on the right side.
  • Fold under 5/8" of the remaining long edge of the gusset (assuming that's the seam allowance you used) and pin. This will be pinned to the front of the raincoat where indicated on the pattern.

Sleeves:

The sleeves are separated into an upper and lower half. A fish-eye-shaped gusset is sewn between these two halves. At two points, the top and bottom half of the sleeves are pulled together and secured. This is one place where the original instructions are very unclear. They tell you to use a snap to hold these layers together, but it did not make sense, either to me or my French friend. First of all, a snap would be difficult to insert through all those layers of fabric, especially because there is a tiny amount of room to maneuver at those points (it's near the end of the gusset, and you can barely stick a finger in there). Even if you could insert a snap, a tug on the sleeve could cause the snap to open, and I did not want that. The following construction tips showed how I handled this. I used the red side of the fabric for the gusset.
  • Stitch the fish-eye gusset to the top of the sleeve, matching notches. Start and end the stitching at the end of the fish-eye – don't extend the stitching beyond into the side seam of the sleeve.
  • Stitch the fish-eye gusset to the bottom of the sleeve. Again, don't extend the stitching beyond the end points.
  • Edge stitch along both edges – both the top and the bottom seams.
  • I had a black tube of fabric left over from when I made the ties for the pocket of the Au Bonheurs skirt. I pinned one end to one side of the gusset seam, laying the raw edge underneath, and top stitching in place and sewing in the same stitches where I had edge stitched. I cut the tie off to about 1" long and pinned to the other side of the sleeve so that the edges of the top and bottom halves are snugged right up against each other. There was not enough room to place this under the presser foot, so I stitched this in place by hand.

    The sleeves, showing the area where the top and bottom of the sleeve have been abutted and held in place with a small tube of fabric stitched underneath. The sleeves have been hemmed and are folded up at the hem.

    The inside of the sleeve gusset, where I attached a tube of fabric. I'm sorry that it's a bit hard to really see.

  • Repeat for the other side of the gusset, where indicated on the pattern.
  • Lay the sleeve flat and observe the edges of the gusset. Stay stitch these pieces together in the seam allowance, on each side of the gusset.
  • The pattern instructs inserting the sleeves while flat, but since I was having issues with the fit of the shoulder, I did not want to do this. I sewed up the side seam of the sleeve and finished it by flat felling. (It is also much easier to flat fell at this point.)
  • Hem the bottom of the sleeves.
  • Run an easing line along each sleeve cap from the front notch to the same approximate location on the back of the cap.

Coat Front

  • Stitch the darts.
  • Reinforce the corner near CF with stay stitching. Clip to the corner.
  • Pin each pocket (by the gusset) to the left and right front, respectively, so that the flat edge of the pocket lines up with the side seam. Note that you should check the pocket placement. I found the pockets are placed low, but I decided to leave it there, as the waist elastic will slightly raise the pocket, but check it out.
  • Sew around the gusset.
  • Fold the bottom of the pocket, covering the gusset.
  • Sew the pocket to the side seam. Repeat for other pocket.

Coat Back with Gusset

Probably the most challenging part of this coat was the back gusset with zipper. The French instructions tell you to attach the gusset to the back, and insert the zipper in between. But figuring out how was a bit of a challenge, especially since I am not lining this coat, so I had to keep in mind how to neatly finish all seams. I warn you that my technique is rather convoluted, but it worked pretty well. I suspect there is a far more elegant way to do this, but I could not figure it out. :)
  • Sew the CB seam from the neckline to the "le zip" mark. Actually, when I laid the zipper against the CB, I decided to sew past the mark by 3/4".
  • Snip the seam allowances to the point where the seam ends.
  • Flat fell the CB seam above the snipped seam allowance.
  • Stay stitch the back neck.
  • The remaining steps are used to insert the zipper/gusset: Fold the remaining seam allowances to the inside, pin, and then baste.
  • Open the 22" closed bottom zipper and lay it on the wrong side of the garment, so that the zipper teeth extend into the opening. Pin, and then baste.
  • Hem the bottom of the gusset. Top-stitch to hold the hem in place.
  • Run a line of stitching 1/4" from the raw edge of the hem from CB for 8 inches or so. Do this on both sides of the back. Ease in the fullness of the hem, turn the raw edge under, and pin. You only need to pin the hem for two inches or so. The hemmed gusset is attached to the back with the hem pinned in place.
  • Lay the coat right side down and place the triangular gusset on top of the opening, also right side down. Pin in place, and then baste. There are now three rows of basting around the zipper opening.

  • Place the zipper foot on your machine and stitch the zipper in place.
  • Remove all of the basting.
  • Trim the seam allowance of the CB seam, but do not trim the seam allowance of the gusset.
  • Fold under the gusset seam allowance and pin, creating a flat fell finish.
  • Insert the end of the elastic cording into the hem casing, which has been pinned. The elastic will be caught when the flat fell seam is stitched. Insert the elastic on both sides of the gusset.
  • Sew around the zipper again, securing the folded edge of the gusset, and catching the elastic on both sides.

Coat Front and Back

  • Sew front to back at the shoulder seams.
  • Flat fell the shoulder seams.
  • Attach hood to the neckline, working around the corners.
  • Flat fell the seam. Only the back neck seam needs to be clean finished, as the front of the jacket is covered by the facing, but it just seemed easier to flat fell the entire seam.
  • Sew the side seams and flat fell them.
  • This is about when I started to poop out on taking such detailed notes on the construction. Sorry, but this post is far too long already. :) Let me know if you have any specific questions.
I finished it! I finished it! This raincoat was fairly involved. It took me three full days of almost nonstop sewing and another couple days of several more hours. Lining the coat might have lessened some of the work because I wouldn't have had to flat fell all the seams.

Back gusset partially zipped.


I'm so glad I finished it now, and not a week from now. We have been having a series of big rainstorms and I am attending meetings most every night this week. I will get lots of wear out of it.

Later, when one of my photographers is around, I will post photos of the coat on me. :)

Sunday, January 17, 2010

Vogue 1018 - Sandra Betzina Skirt (#4)


I am calling this skirt #4, though actually, it's #3 for my wardrobe, as the last one was a Christmas gift for a dear friend. I made hers out of a black wool jersey I had special ordered, which showed off the tucks very nicely. She tells me that it hangs fine, but it does tend to pick up lint.

I decided I would also like to have one of these skirts in black, so I made myself one out of a poly knit. This one is not lined. Not sure I have much else to say about this version, other than I am planing on including it in my 2010 Swap on Stitcher's Guild. It's a nice basic. :)


I finally got started on the Au Bonheurs raincoat. I needed some specialized hardware/tools that took me awhile to round up. At this point I have the pockets, sleeves, and hood all completed, but not attached. I haven't yet cut out the front/back of the coat, because I keep dithering on the size to make, and how much to modify the shoulders, which are very wide on the pattern, but I think the sleeve should sit right at the shoulder point. Hopefully I can get that decided and cut on Sunday, though I have been sewing very slowly this weekend.

It's going to rain all next week and I would like to have the coat done, but there is a lot of fiddly work left, like the two zippers, several more grommets, and the new-fangled snaps from snapsource.com I bought when Sandra Betzina came to talk. (These are her favorite snaps.) I also have to keep switching the thread/bobbin colors between red and black to accommodate the reversible fabric. I hope it will all be worth it. :)

Wednesday, January 13, 2010

Art for Me!

Some of you may recall I got back to sewing last August to deal with stress, and the fact that the kids are growing up and starting to move on. Well, life has continued to be stressful of late, so I am sewing as fast as I can. :)

Then today I had SUCH a treat! My dear friend, Renée, dropped by and we finally exchanged Christmas gifts! You might recall the clothing that I made for her. I gave her clothes, but she gave me ART! The most gorgeous art! For me! :)

First, she gave me a to-die-for pincushion/thread holder that she made. Did I mention that she is the felting queen? I did a bit of felting years ago, learning about the same time that she was learning. Felting never became something I excelled РI lacked the artistic knack Рthough I remember one year, at San Francisco State, I gave a class in how to make felted eggs with little chickens peeping out. The process of felting exacerbated my tendinitis Рjust looking at her work can make my hands tired. :) But Ren̩e took it many levels further and beyond!

Here is it!!! Look at those mushroom pins! I heart this pincushion and it will have pride of place by the chofa with the Ott light. :)


Then, she gave me a book called Shibori Knits. It has some incredibly beautiful projects. I experimented with shibori years ago, back when I was into quilting. The idea of performing that technique on a knit is fascinating.


Finally, she made me the most gorgeous nuno-felted scarf! Nuno is the process of felting wool fiber onto silk. Can you believe this scarf? It is so soft to the touch and the colors are amazing. I can't wait for a cold day to wear it!!!


Renée does not sell her work, but wow, she sure could. I feel so lucky to know her and to be on the receiving end of some of her art!!! Just hanging with her is the best method I know of de-stressing. :)

Saturday, January 9, 2010

Report -- Sewing Workshop Open House


I wore my new Au Bonheur skirt with my black Salsa top. Over it I wore my Plaza jacket, which I took off for the photos. DD1 took these photos at the end of the day, so I am a bit rumpled. In this top photo it was a bit windy, which blew the skirt awry, but DD1 liked this photo the best. :)


Ahhhhhhh.... Today was a fun day. A very fun day. I attended the open house at The Sewing Workshop. The last one I attended was approximately 17 years ago, back when it was owned by Linda Lee. Quite a few teachers spoke and I was particularly interested in Bill Jones's class. He teaches how to embellish synthetic fabrics (like poly chiffon) by cutting it with a soldering iron. That looked like a very fun activity. I just might have to dig out my soldering iron, purchased back when I used to cut Mylar stencils for quilting. :)

I also won a door prize! A generous length of fabric from Satin Moon and a Sewing Workshop purse pattern that I did not own. I don't generally wear pink, so I need to figure out what to do with this very pretty fabric:


I also bought three gorgeous fabrics from a woman who was selling vintage pieces. I kept to the cheaper pieces that I can cut into without guilt.

No sewing today, but it was totally worth it. :)

Thursday, January 7, 2010

Technique -- Drafting a Knot-Front Top

This tutorial describes how to start with a well fitting dolman sleeve top and use it as a basis to draft a knot-front top, similar to this design from Burda World of Fashion, May 2004:


Drafting Instructions

  1. Start with a well fitting dolman sleeve top.

  2. Hold the pattern up to your body and decide where you want the knot. Make a mark, shown on the following diagram as point A. The knot is located at this point and this is where the seam will be.

  3. From point A, end the CF line approx 2 1/2" above that point. This may mean drawing a higher neckline, or it may mean lowering it. The image above shows the neckline being raised (see the dotted line). The new neckline is marked by point C. The distance from point A to point C is 2 1/2".
  4. Draw in the seam from CF to the side seam/underarm. Precisely where to end this seam at the underarm is a judgment call, but the Burda pattern places it about where I have shown.

  5. Mark point D, about 2 1/2" inches from CF on the new seamline.

  6. Trace off the two pattern pieces: upper front and lower front. Make sure you maintain point D on both pieces.

  7. Adjust the CF line on the upper front: extend the neckline 1/4" from CF and taper that line back to the original CF. The drawing shows the original CF line with a dotted line. The solid line is the new CF line. This adds a bit of extra fabric at the neckline to accommodate the twist.
  8. Mark point E on the lower front. If you look at the photo of the Burda top, they located point E so low that it exposes the bra. (She must not be wearing a bra, but trust me on this one.) I suggest you make that point much higher, maybe 1.5" from the top of the pattern piece.
The back dolman pattern piece is left unchanged. You can now add seam allowances to the paper pattern, if you like. Or you can add them as you cut out the pattern (which is what I do). Either way, make sure to add seam allowances to the CF of the lower front, which now is a seam. The CF of the upper front is cut on the fold.

Cutting Instructions

This pattern assumes a knit fabric, since the fit of the original t-shirt assumes a knit fabric. The stretch needs to go around the body. It might be hard to find a fabric wide enough to cut the back and upper front pattern pieces on the fold. In that case you can shorten the sleeves, or you can use a 4-way stretch and cut the pattern across the grain. (I believe this is exactly why Burda didn't provide the pattern in a larger size.)
  • Back: Cut one on fold.
  • Upper front: Cut one on fold. Make sure you transfer mark D with a snip in the seam allowance.
  • Lower front: Cut two. Make sure you transfer marks D and E with snips in the seam allowance.

Construction Instructions

I have made this top a few times now and I found I prefer a different order to the instructions as those provided by Burda, which are pretty terse. (One of the reviews of this pattern on Pattern Review shows the Burda order.)

This is how I construct it:

  1. Finish the neck edges of the front and the back.
  2. Sew the CF seam on the lower front, from the hem to point E. Press the seam open.
  3. Sew the left bottom front to the left upper front, stopping at point D.
  4. Twist the upper front 360 degrees.
  5. Preserving the twist, sew the right bottom front to the right upper front, stopping at point D. It should look something like this:

  6. Form the knot: Place the top corner of the right front under the twist. Twist the top corner of the left front over the twist. Line up the CF to CF, right sides together, and stitch on the sewing machine as far as you can go to point E.

  7. The finished knot should look something like this:

    (This is my muslin, so I have not finished the neck edge.) The front is now completely constructed. The final steps are the same as they would be for any t-shirt.
  8. Sew the shoulder seams.
  9. Sew the underarm/side seams.
  10. Hem the sleeves and bottom.
Here is my first muslin:


This created a nice v-neck, but was a bit lower than I wanted. For a second draft, I would raise the location of the knot even higher. I would also move the seam a bit -- make it more horizontal over the bust.

That's it! It's pretty easy to draft this pattern and I hope my instructions haven't daunted or confused you.

If you make a top following these instructions, please let me know!

Technique -- Drafting a Dolman Sleeved Top

For some time now I have been saying that I wanted to draft a knot top, similar to #111, from Burda World of Fashion, May, 2004. You can see that design here:


This top features a high knot, rather than a knot at the bustline, as you more commonly see. That style is too revealing for many women, such as myself. Some women solve the problem by wearing a camisole, or by using modesty panel, but Burda's design makes that unnecessary.


Unfortunately, this issue is not easy to obtain and, even if you do manage to get your hands on a copy, the pattern is provided only in sizes 34 to 40.

In order to draft this pattern, you need to start with a well-fitting dolman sleeve pattern. This tutorial explains how to draft a dolman sleeved pattern. It is assumed that these pattern pieces do not have any seam allowance. Cut away seam allowances from your original t-shirt pattern. At the end, you can add the seam allowances back.

  1. Start with a well-fitting long-sleeved t-shirt pattern.

  2. Lay the top on a large piece of paper, and trace around the shoulder, center front, hem, and side seam. The dotted lines indicate the lines we don't really need.

  3. Extend the shoulder line.

  4. Fold the sleeve in half, the long way. Lay the should point against the shoulder, lining the fold against the lengthened shoulder line.

  5. Trace around the sleeve hem, and the sleeve. Join the sleeve to the body with a curve. The higher the curve, the tighter the fit under the arm. If you make it too high, the top may pull at the bust. If you make the curve too low, it may be too baggy. Make a best guess and you may have to tweak the curve when you make your muslin.

  6. The final pattern. Repeat this process for the back.


If you are going to test this pattern, make sure to add seam allowances. If you are going to use this pattern to make a knot top, do not add seam allowances yet.

Next, I will post instructions on how to create a knot front top.