Sunday, September 13, 2009

Mrs Stylebook Summer 2009 - Top #31D


Just as I came back to sewing, I discovered Mrs Stylebook, a Japanese sewing magazine, thanks to Claudine's blog. Based on her blog and on the scans another blogger, Cidell, posted from this magazine, I. LOST. MY. MIND.

I rushed to my nearest Kinokuniya store. They had no back issues, so I contented myself with the most recent issue, which they tell me is summer 2009. This magazine has virtually no English and, unlike the European fashion sewing magazines, only a few designs have included patterns that you trace off. Most of the designs have diagrams showing you how to draft them. This suits me fine, for the most part. I am not an expert pattern drafter, but I took one year of flat pattern design 20 years ago and I can get along well enough. I typically start with a TNT (tried 'n true) pattern that has most of the features I want, and go from there. My slopers from 20 years ago no longer work and I haven't bothered to make up new ones. :)

For my first Mrs Stylebook effort, I liked the neckline detail on this top:


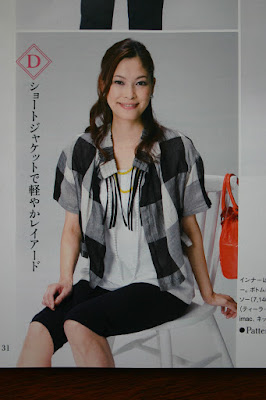
and here is the instructions page for that design (this is all the help you get, but it's pretty helpful):


The alterations are pretty much what you would expect: the neckline is cut down, front and back. The added neckline piece is simply a rectangle, long enough to cover the neckline and wide enough to fit the four channels for the cording, when doubled. (I cut mine about 5 1/2 inches wide and the full width of the fabric -- I cut off the excess later. My neckline was about 38" wide.) The front of the top is extended 14cm (5.5 inches) which is then be gathered back up by the four cords. (I was concerned that an additional 11" might be too much fabric for me, and it was, but I managed to fix that later.) At first I was thinking I'd use this neckline on a buttoned top, then I quickly realized that would look weird. It was no mistake that this top has no closure. :)

I started with my darted t-shirt pattern and made the changes. For my fabric, I am using a blue check fabric that I thought was cotton. I had convinced myself it was cotton because, well, it looked like a cotton check should look, to me. Even as I cut it out, trying to match the plaid, and it wiggled around horribly, I was thinking cotton. It wasn't until I sat at my sewing machine I realized that this fabric is behaving in every way like a rayon. Yup, a rayon, which means it has a lovely drape. :)

I decided I wanted to do something different for the sleeves. For one thing, I did NOT want to have to match the plaid across the sleeves, so I decided to cut them on the bias. I also decided to emulate a ruched sleeve cuff I had seen on another top. I had studied how that effect was achieved and it was more complex than I wanted to deal with, so I winged it and figured it out as I went. It worked pretty well and maybe I'll blog that technique another time. I also gave the garment a shirttail hem with side slits. I love side slits. :)

As I was sewing up the design, once again I was not liking how voluminous the top was, so I decided to sew in some relaxed darts. Two under each bust (four total) and two in the back. I also removed 4 inches in the side seam at the bust, tapered to nothing at the hem. (Frankly, I should have taken it from the hem too, but I didn't want to lose my shirttail hem with those nice slits.) The extra fullness I had added at CF to accommodate the shirred neckline needed to be tamed down. (I had worried about this when I was drafting the pattern, but it's worked out ok with my alterations.)
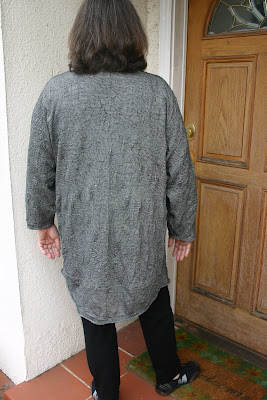
So here it is:


and here is the neckline detail:


and the ruched sleeves:


I need to make myself a nice blue tank to wear underneath this top. I am happy to say I have enough of this wonderful check to make a skirt. I have already started drafting that. And, no, I won't be wearing them together. ;)

Butterick 5045 - Top or "Cover Up"


I had tried on a top in a boutique that I just loved but, at over $300, was out of my current budget. I decided to copy the top and the "cover up" from this Butterick pattern is very similar in line.

1. The original top as made of a what I would call a double faced voile. It was a semi-sheer cotton but the fabric had two sides and it had a surprisingly nice drape. The front was a dark plaid and the back was solid black. I learned from the Stitcher's Guild forum that this is a Japanese fabric called "double gauze". I've trolled the internet but have only seen double gauze for sale in children's prints or solids, but, hopefully, one day it will become generally available to us sewers in grownup prints. :)

2. The original top buttoned. The right side had a large buttonhole that was pulled up to above the left breast and buttoned on a large button, forming a draped neckline. (The back of the double-faced fabric showed so it had the effect of a solid black contrast neckline.)

3. The front of the top was shorter than the back, which came almost to my knees.

Here's my version of the top, worn up (my preferred way):

and down:


I had this fabulous fabric that a friend told me reminded her of the fabric used by Babette. It's a knit, but a very unusual knit that has these wonderful permanent crinkles. I wish I bolts of this fabric in different colors. :) As it is, I have it in a microscopic black/white houndstooth which, of course, has an overall "grey" effect. Oops, another "grey" top. ;)


This pattern needed a few alterations. I cut out view B (coverup with sleeves) in an XL, which is correct for my bust measurement. I rounded the point off at the front -- this is where the buttonhole goes on the left front. I also shortened it. I cut it out of my beloved fabric, putting the front hem on the naturally rolled hem at the bottom of the fabric.

The pattern was delightfully easy to sew up. Perhaps because I love this fabric so much, I took extra care and turned under all raw edges and hand stitched them down. I hand stitched the raw edge on the front, but I left the hem raw and rolled.

As the top came together, I was disappointed with the look. I realized it was just too voluminous for me. I started playing with the fit and, in the end, I removed about 12 inches from the hip area and about 4 from the bust area. I could have removed more from the bust, but I'd already sewn in the sleeves and didn't want to disassemble it.

Also, I had cut the back too short. I was very laissez-faire when I cut the back and, oops, it was really too short. It also lacked the rolled edge of the front (I was thinking at the time that I would hem the bottom of the garment.) So I cut another strip of the rolled edge from the fabric, though I cut it in a non-rectangular shape. At the CB, the strip was maybe 6" wide, but tapered to approx 2" at the side seam. I sewed this to my back hem and got my "longer in back than front" effect. :)

On the back you can make out the seam at the bottom:


I like the finished top. Just when I got to the point where I was going to sew the buttonhole, I decided to wait. With the buttonhole I can wear the top only one way. Without the buttonhole I can wear it draped up as a top (and held closed with a pin) or down and loose as a jacket.

I found this pin in my jewelry box. I can't remember where I bought it, but it was probably at a craft or street fair and I love the whimsy of it. :)


I wish I had a lot more of this fabric, but I am content that I have a piece large enough to squeeze out a sleeveless tunic. I think it will make a good layering piece, especially with that wonderful funky pocket included in the pattern.

P.S. If you haven't clicked on the Babette link and checked out her clothing, please do! Scroll through her Fall '09 clothes, for example. Look at that skirt and top in slide 4!!! Check out that drape detail on both. Drool... Her designs make my heart sing. :D